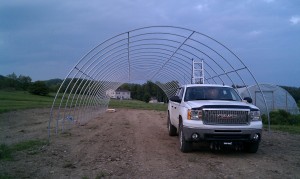
High tunnels are becoming more and more popular for home and market gardening. The biggest advantage to a high tunnel is the extended growing season it gives you, especially in northern climates. The other huge advantage is the ability to have complete control over the irrigation of your crops. Some crops such as berries will absorb water through the fruit itself and weaken the flavor, so growing in a tunnel can provide a superior product.
I spent a couple of years researching tunnels before I finally built one, and I am glad that I did. DIYers can find tons of plans and tools, and for people that want the engineering done for them, there is a multitude of kits for sale. After a long debate I ended up building my first tunnel from scratch.
I bought a 20’ hoop bender from the folks over at Lost Creek Greenhouses and followed their plans with just a few modifications. The bender is designed to work with top rail for chain link fencing. One challenge I had was finding 16 gauge steel, after a long search I had to use thinner 17 gauge. So far we have not had any issues (with the steel). With some help from family and friends it did not take long to get the 20’x40’ tunnel erected and covered. We had so much success in the small tunnel, that we built a second, much larger tunnel that measures 26’x96’. The larger tunnel was built from a kit made by ClearSpan (FarmTek).
For the average home gardener, I think it is  safe to say that a homemade tunnel will more than suffice. However I would caution against building anything wider that 20’ without going to a kit. For length, anything too far over 100’ can cause a ventilation challenge, so if you need more space than that, build two.
Now that we have two tunnels up and running I would like to share some lessons that I have learned.
- Level the area first, with just enough of a slope that water will run off.
Leveling the site is important, but be sure to preserve your top soil so you have something to plant in. Also, if you are using raised beds they can turn into dams during a storm or spring melt. I have found that a slight crown to the site works best for larger tunnels.
- Use the best quality greenhouse film you can afford.
- Use the best quality greenhouse film you can afford. (Should I list this a third time?)
- Use the best quality greenhouse film you can afford. (Yeah, it’s that important.)
This can’t be over stated. But seriously, it is important. If you are trying to keep initial cost low you can go with a middle of the road film and upgrade it when it is time to replace it. (This is what we did.)
- Over build your film attachment system if you are in a windy area.
A lot of plans call for 1×3 or 1×6 boards to attach film and Wiggle Wire to. I have learned from personal experience that a 1×6 board that is bolted to Wiggle Wire will actually shatter in 80 mph winds, we went with 2x6s on the second tunnel. If you are using Wiggle Wire with a board backing, be sure to drive tek screws through the channel, board, and hoop when possible.
- Wiggle Wire or something similar does make life easier.
This can be hard on film if you plan on taking the film off every winter but it does make attaching film easier. There are other systems out there that may be better, but I only have experience with wiggle wire.
- Do not water from above in a tunnel. Invest in drip irrigation.
Even with the sides up and ends open, humidity can be higher in a tunnel than outside. This means it can take longer for leaves to dry, giving diseases and fungus a place to take up residency.
I hope you found some of this information helpful. I will be adding construction photos as soon as I have time to dig them up. If you are interested in building your own high tunnel and have questions, feel free to leave a comment or use our contact form. If I can’t answer your question I bet I have a friend that can.

4 Responses to High Tunnel Construction Lessons